
Ask an AI about this page
 ChatGPT
 Claude
 Perplexity
 Google AI Mode
 Microsoft Copilot
 Grok
Grok Mistral Le Chat
Automate tasks on your PC with Power Automate for desktop
Power Automate for desktop is a free Microsoft app for Windows 10 and Windows 11 that repeats clicks, typing and file tasks on your own PC. You build a desktop flow from ready-made actions, or record what you do, then run it with one click whenever you need it. In this guide you sign in with your work account, build a flow that adds today’s date to the names of your report files, and run it.
We tested these steps on 27 September 2026 on Windows 11, signed in with a Microsoft 365 work account, using sample files in a folder called “Contoh - Laporan”.
How it differs from cloud flows
Section titled “How it differs from cloud flows”Power Automate comes in two parts, and they do different jobs. This guide is about the first one.
- Desktop flows run on your own PC in the Power Automate for desktop app. They work with anything on your screen: files and folders, Excel, websites and older Windows programs. Your PC must be switched on and signed in.
- Cloud flows run on Microsoft’s servers, at make.powerautomate.com. They connect online services, such as saving Outlook attachments to OneDrive or posting to Teams, and run even when your PC is off. See what Power Automate is.
Get Power Automate for desktop
Section titled “Get Power Automate for desktop”Microsoft includes Power Automate with Windows at no extra cost. How you get it depends on your version of Windows.
- Windows 11: it is already there. Search for “Power Automate” in the Windows search bar. Microsoft says the app downloads automatically the first time you open it.
- Windows 10: you can use it too, but you download it from Microsoft first. Get it from the Microsoft Store (no admin rights needed, and it updates itself), or use the installer on Microsoft’s Install Power Automate page (needs admin rights).
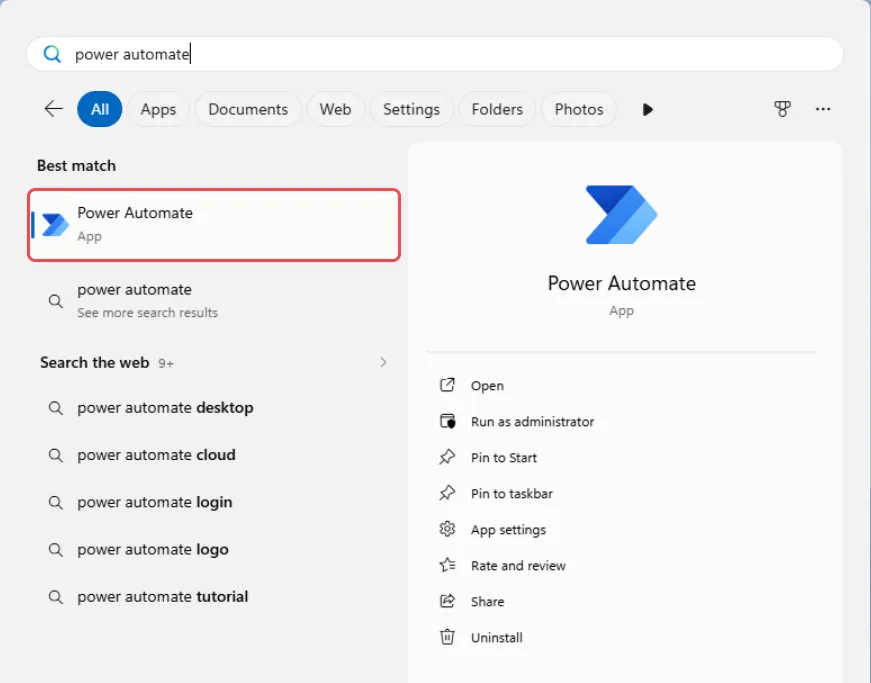
To open it on Windows 11, follow these steps.
-
Select Start and type “power automate”.
-
Select Power Automate under Best match.
-
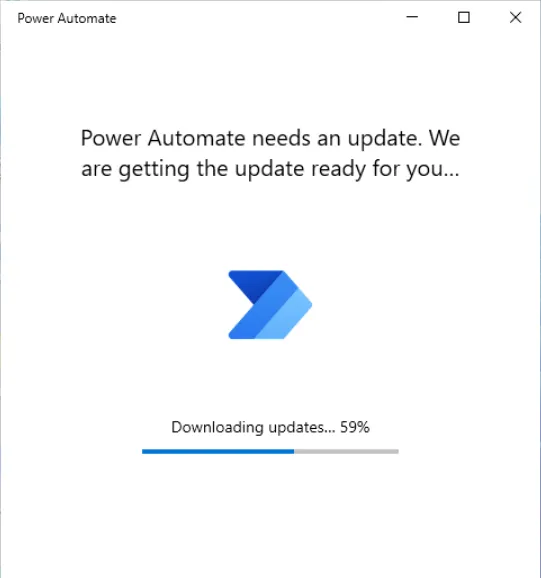
The first time, you see Power Automate needs an update. We are getting the update ready for you… while Windows downloads the full app. This took about 4 minutes in our test.
Sign in with your work account
Section titled “Sign in with your work account”Power Automate asks you to sign in before you can build flows. Use the same email and password as for Microsoft 365.
-
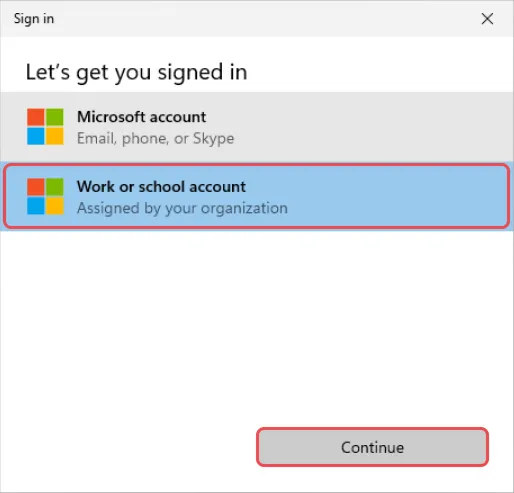
Select Sign in.
-
Under Let’s get you signed in, select Work or school account, then Continue.
-
Type your work email and select Next. Type your password and complete two-step verification, as you do for Microsoft 365.
-
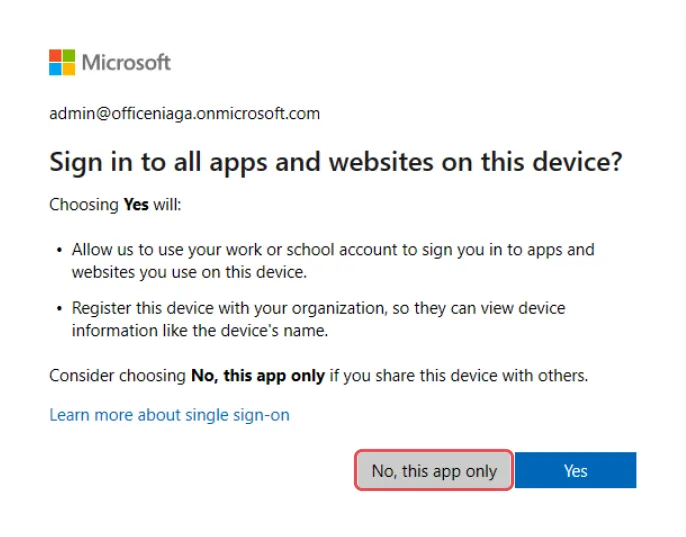
If Microsoft asks Sign in to all apps and websites on this device?, select No, this app only on a shared computer. On your own work PC, Yes is fine.
-
Power Automate may ask you to sign in once more while it loads your company’s environment. Complete that sign-in too. If you close it, you see The environment couldn’t be loaded. Select Retry to get the sign-in back.
If you close the welcome tour, it stays available under Help at the top right.
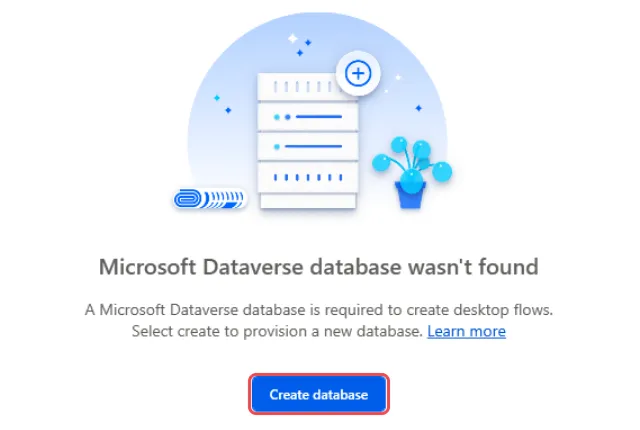
If you see “Microsoft Dataverse database wasn’t found”
Section titled “If you see “Microsoft Dataverse database wasn’t found””A work account saves desktop flows in a Microsoft Dataverse database in your company’s default environment. The first person in a company to use Power Automate for desktop may see this message.
-
Select Create database.
-
Wait while Power Automate shows Setting up Dataverse…. This took about 5 minutes in our test.
-
Close Power Automate completely from its icon next to the clock, then open it again. New flow is now available.
If you see Insufficient permissions after that, your account has no security role in the new database yet. Ask your Microsoft 365 admin to add one in the Power Platform admin centre, or contact us and we will help.
Build your first desktop flow
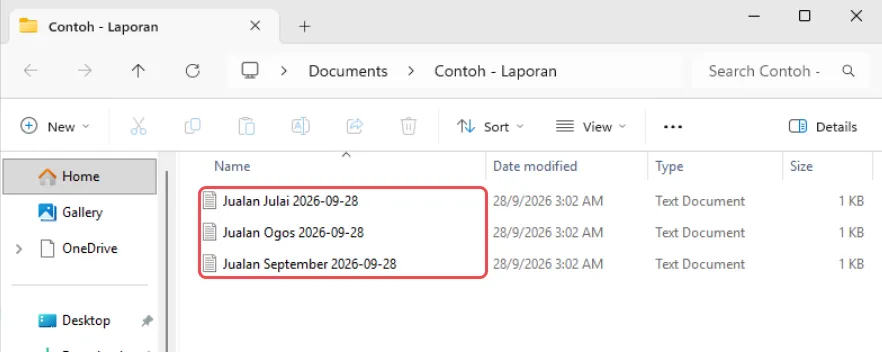
Section titled “Build your first desktop flow”Our example adds today’s date to the end of every text file in a folder. For example, “Jualan Julai.txt” becomes “Jualan Julai 2026-09-28.txt”. It only renames files, so it is safe to try. Before you start, put a few test files in a folder, such as “Contoh - Laporan” in Documents.
-
In Power Automate, select New flow.
-
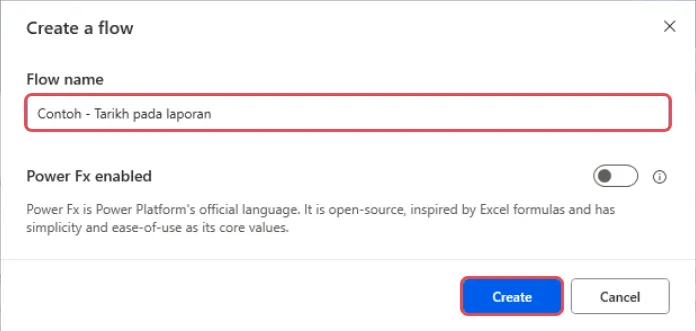
In Create a flow, type a name in Flow name, such as “Contoh - Tarikh pada laporan”, and select Create. Leave Power Fx enabled off.
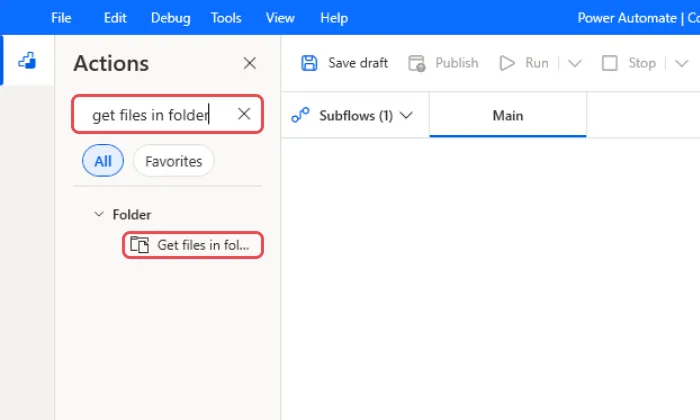
The flow designer opens in a new window. The Actions pane on the left lists everything a flow can do, grouped into sections such as File, Folder, Excel and UI automation.
-
In the Actions pane, type “get files in folder” in Search. Drag Get files in folder onto the empty area in the middle.
-
In Folder, type the path of your folder, such as
C:\Users\<your name>\Documents\Contoh - Laporan. You can also select the folder icon at the end of the box to browse to it. -
In File filter, type
*.txtto pick only text files. Leave*to pick every file. Select Save.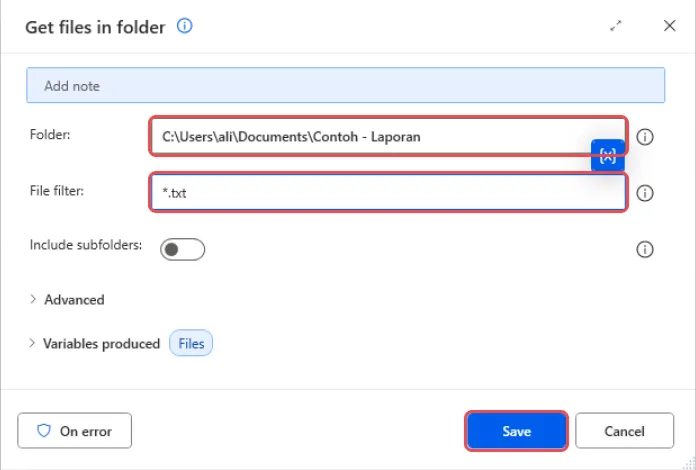
The action saves the list of files in a variable called Files, which the next action uses.
-
Search for “rename file” and drag Rename file(s) below the first action.
-
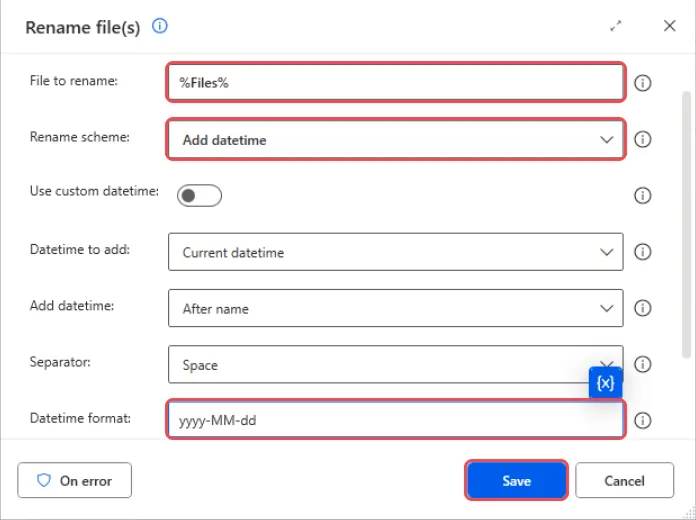
Fill in the box as follows, then select Save.
- File to rename: type
%Files%. The percent signs tell Power Automate to use the Files variable from step 5. - Rename scheme: select Add datetime.
- Datetime to add: leave Current datetime.
- Add datetime: leave After name.
- Datetime format: type
yyyy-MM-dd, so the date looks like 2026-09-28.
- File to rename: type
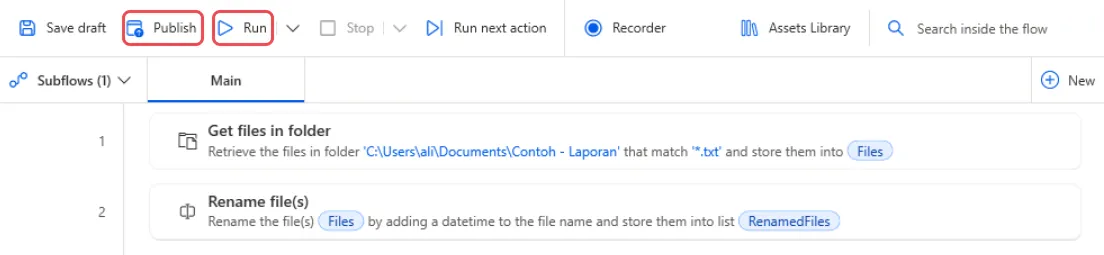
Your flow now has two numbered actions: Get files in folder and Rename file(s).
Run the flow and check the result
Section titled “Run the flow and check the result”You can run a flow from the designer while you build it. Power Automate runs the actions in order, top to bottom.
-
Select Run in the toolbar at the top.
-
When the status at the bottom left says Status: Ready again, the flow has finished. The Variables pane on the right shows the files it found and renamed.
-
Open your folder in File Explorer. Each file now ends with today’s date.
-
Select Publish in the toolbar to save the flow. Save draft also saves your changes, but the version that runs from the main window is the last one you published.
-
Close the designer window.
If the flow stops with an error instead, open the first action again and check the folder path is exactly right.
Run it again later
Section titled “Run it again later”Your flow now appears under Flows → My flows in the main Power Automate window.
-
Open Power Automate and select Flows.
-
Select Run (the triangle) next to your flow.

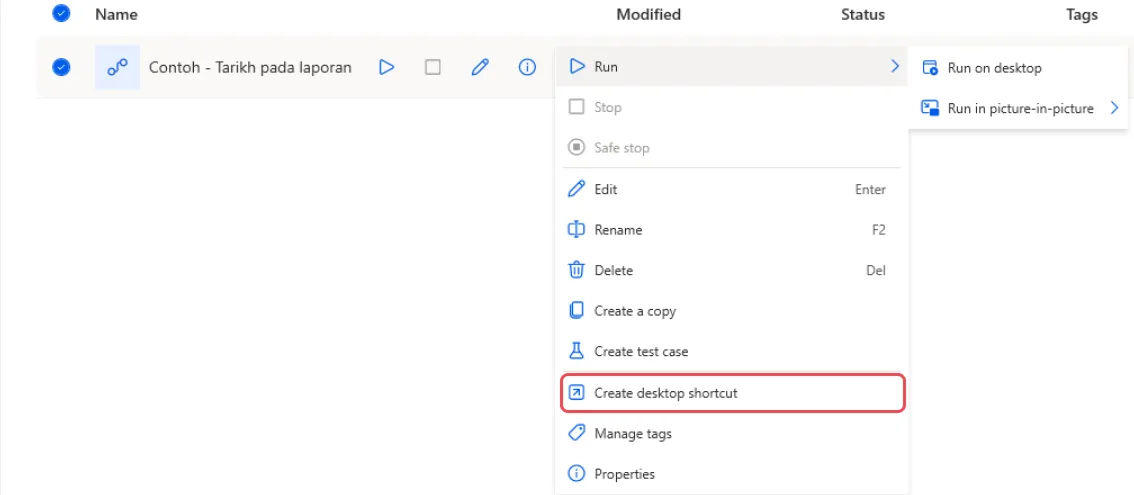
To run it straight from your desktop, select the three dots next to the flow, then Create desktop shortcut. You can also Rename, Delete or Edit the flow from the same menu.
Record clicks and typing instead
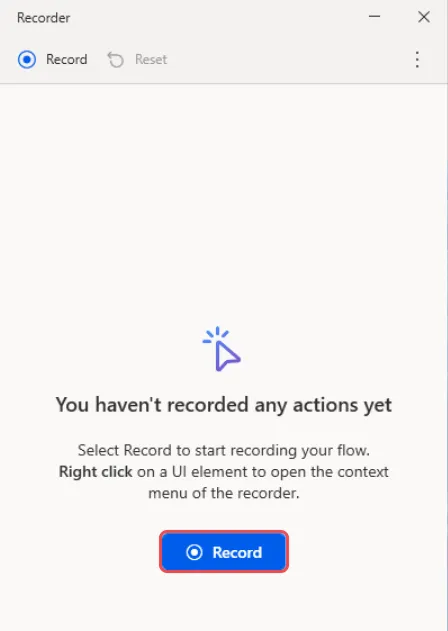
Section titled “Record clicks and typing instead”For work inside other apps or websites, such as copying figures into a form, you can let Power Automate watch what you do. The recorder turns each click and keystroke into an action.
-
In the flow designer, select Recorder in the toolbar.
-
In the Recorder window, select Record, then do the task once, slowly.
-
Select Done. The recorded steps appear as actions in your flow. Check each one, remove any mistakes, then Run the flow to test it.
Recorded flows depend on windows looking the same each time. Keep the app open in the same place, and don’t touch the mouse or keyboard while the flow runs.
What’s free and what needs Premium
Section titled “What’s free and what needs Premium”Microsoft includes desktop flows with Windows for personal productivity. Here is what Microsoft says each option covers.
- Free with Windows: build and run desktop flows on your own PC while you are there to watch them (Microsoft calls this “attended” automation), with the recorder and more than 400 actions.
- Needs Power Automate Premium: running desktop flows from cloud flows (for example, on a schedule or when an email arrives), sharing desktop flows with colleagues, saving flows in environments other than the default one, and premium and custom actions.
- Needs a Process licence on top: running desktop flows unattended, on a machine where nobody is signed in.
On Windows 10 Home and Windows 11 Home, Microsoft says you can build and run desktop flows on the PC but can’t trigger them from the cloud, even with Premium. See Microsoft’s licensing FAQ for details, and ask us before buying Premium.
Still stuck
Section titled “Still stuck”WhatsApp our support team at +60 16-916 3324.
Common issues
Power Automate says Microsoft Dataverse database wasn't found.
A work account keeps its desktop flows in a Dataverse database in your company's default environment. Select Create database and wait a few minutes. If you then see Error while configuring Dataverse database or Insufficient permissions, close Power Automate from the icon next to the clock, open it again, and ask your Microsoft 365 admin to check that you have a security role in that environment.
New flow is greyed out after I sign in.
Power Automate is still loading your environment. Wait a minute, select Flows on the left, then Refresh. If it stays greyed out, close Power Automate from the icon next to the clock and open it again.
My flow can't find a window or a button it recorded.
The recorder remembers windows and buttons by their names. If the window title changed, the app is minimised, or the screen is laid out differently, the flow stops with an error. Open the app the way it was when you recorded, keep the window visible while the flow runs, and don't use the mouse until it finishes. File and folder actions, like the ones in this guide, don't depend on windows at all.
Can I run my desktop flow on a schedule, or from a cloud flow?
Not with the free version. Microsoft says running desktop flows from cloud flows, and running them on a schedule through the cloud, needs Power Automate Premium. On Windows 10 Home and Windows 11 Home you can't trigger desktop flows from the cloud at all.
Can I sign in with a personal Microsoft account instead?
Yes, but Microsoft saves flows made with a personal Microsoft account in that account's OneDrive, not in your company's environment, so your company can't manage or keep them. For company work, sign in with your work email.
Was this article helpful?
Thanks for your feedback.
Sorry this didn't help. WhatsApp us and we'll sort it out with you.